10 Tips to Teach Chess to Kids
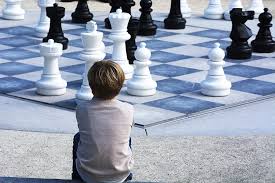
Chess coaching for kids was the subject of a few posts of mines already. In this post I want to share with you a few funny tips that you can use.
Actually, more than tips, I am going to present to you an entire strategy that you can follow when teaching. You can easily follow the points one after the other, if you think they are valuable to your teaching strategy.
If you don’t want to follow any teaching strategy in particular, but just to have fun, then you can also use them in random order, like real “tips”.
You can be a professional coach, or just a fantastic parent who’s trying to teach her/his owns kids one of the most fascinating game on earth! Either way, keep reading!
1. Explain how pawns move
First things first. No matter how you are going to teach and practice chess with your students, they will need to learn the rules.
My approach in this case is to start with Pawns only. Empty a chessboard, take a pawn and place it on the board. Then explain the rules for its movements. You will probably need one more pawn (of opposite color) in order to explain the capture’s rules.
Remember to focus on pawns only; let the pieces aside. You have to explain the en-passant capture too, in my opinion, but you should skip the promotion rule (as you are not going to talk about the other pieces anyway).
Show A LOT of examples on an empty chessboard. And I mean, really A LOT. Kids are awesome at learning new things when they see them.
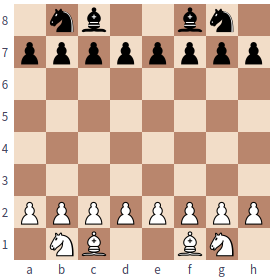
I also suggest to show some simple tricks, like the type of tricks that you see in kings and pawns endgames, just that you don’t have kings now! For example you can show the following position:
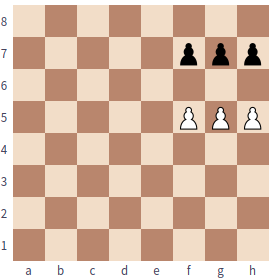
And you can tell them – Hey let’s say the first who reaches the end of the board wins! So now you can show them the trick 1. g6 hxg6 2. f6 gxf6 3.h6 etc.
This last point might seem a bit too advanced, but it’s a good preparation for the next step… where I am going to surprise you!
2. Play some games with pawns only
You read it well. Pawns ONLY. So, what do I mean? It’s quite simple: take a chessboard and set it up like this one
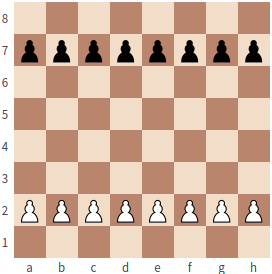
Now challenge your kid(s) saying — Choose one color, kid, I will take the other side and the first of us that reaches the other end of the board with a pawn wins!
Obviously you must make sure that (s)he respects the rules about pawns and captures. Especially at the beginning, you may need to recall how rules works for him, every now and then.
What is my point with this “weird” suggestion, you may ask. With just paws on the board, the young boys and girls will develop their ability to calculate more quickly. And actually, to tell you the entire truth, king and pawns endgame are a favorite way to train calculation even for GMs!
There is one final point about this second step (or second tips, if you will) that I want to suggest. Even if your student is just at the beginning of her/his chess career, there’s still some chance that interesting patterns arise in this pawns-only game. If that happens, then you should try to analyze these patterns with your student, almost like you would do in a tactical position of a real game.
3. Explain how knights move
Okay now you’re warming up. Clear the chessboard again and place a knight in one of the 4 central squares. Go ahead and explain in detail what are the rules that dictate its movement.
Knights are often the most loved pieces, especially by kids. Try to take advantage of this, which is also the reason why I am suggesting knights as the first piece, right after pawns.
One more thing you can do while explaining how knights move, is to occasionally bring a pawn on the board. They have already seen those! Make some example of captures, knight jump without capture, or pawn capturing a knight, etc.
4. Play some games with pawns and knights
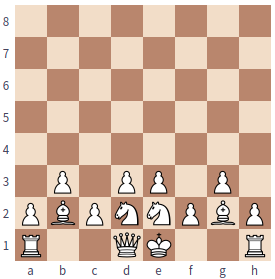
You start understanding the strategy, don’t you? Clear again your chessboard and set it up like this one
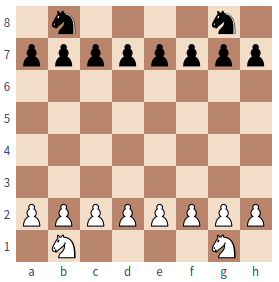
Then challenge again your student(s) to the same game as before. Actually, now that you have got knights, you can make a slight change saying that the winner will be the one who reaches first the other end, or captures all opponent’s pieces.
If you are training with your children, or if you are a teacher and have more than one student, then it would be a fantastic idea to let them play this game. You can just stay there, watch the game, take notes of a few key patterns that you would like to show them after they have finished, and of course check that rules are respected.
I have mentioned in a previous post of mines what beneficial effects chess have on kids, and learning to respect rules is one of those. And it’s one of those that I’ll never be tired to repeat!
Even though it may be a bit boring for you, try to keep going with this strategy and play several “games” like this. I would say at the least ten. They can ask you what are the other pieces for; just smile and say you’ll tell them soon.
Again, having less pieces on the board is similar to practicing calculation, the same that studying chess endgames it. It may sound strange to some, but the emptier the chessboard is, the more difficult to calculate is (on average).
5. Explain how bishops move… you got the point now!
If you’ve made it till here, then you’re killing it. And tips 5 will be a breeze for you.
Empty the chessboard once more, and place one bishop in a central square. Go ahead and explain the rules for its movements as much in detail as you can. Movement, captures, everything.
Then take a second bishop (of the same color) and place it on a square of different color than the first bishop. Go ahead and explain again, emphasizing the fact that the two bishops will always move on diagonals of different colors, and therefore never touche (or capture) each to another.
Now you can continue in similar fashion as before. Prepare a chessboard like this one
and start the usual challenge with your students.
As the chessboard gets more crowded, you should probably also increase the number of games that you play with this set-up. Again, I think 10 at the least. Don’t worry about time, this is definitely not a waste of time! In fact, your students are working very hard on improving their visualization of the board, as well as their calculation ability.
I am not going to repeat myself with one more tip for Rooks, Queens and King, but you should not jump any step!
Introduce a new piece every time, first explaining in detail how it works and then play a few games with this new guy on the board.
Once you have played this game with the chessboard complete, Kings included, then it’s time to introduce the remaining rules. So for example, the checks, checkmate, castle, and what is the real objective of a chess game.
Take all time that’s needed for these final steps, as they are quite critical. Also, emphasize that the real objective is NOT to capture all pieces, rather to capture the king. And mention that sometimes you can sacrifice one or more of your pieces in order to get to the opponent’s king.
6. Make up a opening scheme and play it
Now that your students know all rules and the real goal of a game, it’s time for serious business.
Prepare a chessboard for a “real” game (so, with all pieces on it) but before starting explain to the kids that you are going to use a very special strategy in the first moves.
This can be whatever random opening scheme cross your mind. It does not have to be good, but it must be easy to remember for them. So for example 1. Nf3 Nf6 2. Nc3 Nc6 could be a good choice because it’s easy to remember.
Another possibility is to tell them — Hey I am going to move pawns by 1 square only and place behind them my knights and my bishops and you’re never gonna crack my fortress! So basically something like this one:
This kind of opening is not great although it’s not loosing either, but the main point is that it’s easy to remember. The objective here is to make them familiar with what a opening scheme means, but without stressing it too much with theory, variations, etc.
Also, it’s good that they start playing one scheme from the beginning and become “expert” in the positions that arise from that scheme. After all, the larger number of positions you are capable to play well, the stronger you are.
7. Introduce the stories of two famous chess players
If you arrive at tips 7 then probably some months have passed. Or weeks, at the very least. It’s time for a break!
Your next goal as a coach will be to make your students passionate about chess. Even if they are very young I still believe that talking about chess history is a good attempt.
I don’t know how good of a storyteller you are, but you should try to depict one or two famous chess players (famous for you, unknown to them) in a attractive way. The best attempt would be, in my opinion, with your own favorites. You probably know a lot of things about them, and are able to share your passion for them with your children.
Let me give an example. One of my favorite chess players is surely Mikhail Tal. If I were to describe them to some kids, I would say what a magician Tal was, capable of hunting the opponent’s king down even when no alarm signs were visible.
I would say his attacking maneuvers were blazing fast and that he won one of the most beautiful chess championship ever, when he was very very young and played it against a old and very experienced guy!
I would show pictures of him (by the way, his biography Life & Games of Mikhail Tal is one of the best book I’ve ever read and contains a lot of great photos) and tell about how loved was him by everyone in the chess world, rivals included.
We all need reference points after all. Heroes, if you will. It’s OK if you students become fan of someone else different than you! Having a great and famous player as reference is a very good thing in my opinion. For example, it can motivate further in studying games by that player, and with famous players chances to learn a lot things just by studying their games are very high!
8. Watch a movie about chess
My tip number 8 continues on the same track of tip 7. It would be awesome if at this point your students started falling in love not only with the game, but also its background and everything that revolves around it, while still practicing the game itself.
So after you’ve introduced one or two famous player, it’s time to go to the cinema! I suggest you to pick up a good movie whose plot deals with chess and watch it together with your students/children.
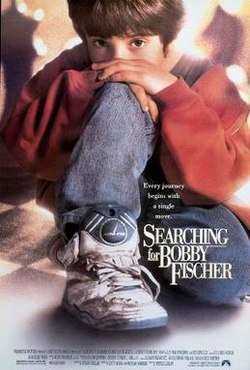
There is plenty of choices, but I am going to go ahead and tell you my favorite movie on this topic: Searching for Bobby Fischer, a movie from 1993, directed by Steven Zaillian. It’s roughly based on the true story of Joshua Waitzkin (born 1976), a chess prodigy who became IM at the age of 16, but nonetheless stopped playing chess around the year 1999.
Choosing a movie can be a difficult challenge; in case, choose more than one and watch them all!
9. Beat them in an actual game
Tips 7 and 8 are not meant to stop the training, just to relax it a little bit. Hopefully you’ll continue practicing with your students even in the days where you have prepared a nice chat about chess history, or when you have planned to watch a movie.
At any rate, with tip number 9 we are back to serious business!
Get your chessboard ready and start playing with them. This time it must be you playing against one (or all) of them. Don’t play random opening, this is a real battle so play your strongest chess. And beat the opponent! Ehm… the young boy/girl 🙂
The point is that loosing a game where a sudden change in the first moves happened will (hopefully) animate their curiosity about what’s going on, why they lost it, how they lost it, where they could improve.
It’s your task, of course, to put these questions on the table and in their mind too. Play with kids’ curiosity and creativity whenever you can!
10. Gift them their first chess book!
Okay, this is a big step. Or, let’s say, it would be a big step if I was the kid in point.
I am in love with chess books, even today that I don’t practice anymore daily. I read a whole lot of them (notice: read, not studied). And of course I remember what was my first chess book as well as who gave it to me. It was Fischer/Spassky: The New York Times Report on the Chess Match of the Century. A long and unforgettable title, for me.
If your students are very young you probably want to choose something simpler than my first one! I was already 14 anyway when I got that book.
On the other hand, be sure to choose something that they can learn valuable insights from! Not just a random “Chess for Newbie” books with lots of figures and no real value.
If you are a professional coach then I think a very good option would be to choose a book and study it together with your students, and leaving the book to them ultimately. In this case the book can even be moderately advanced.
Conclusions
In this post I shared with you my personal recipe for teaching chess to very young boys and girls, starting from the early rules and moves.
Before concluding, I want to point to some other posts in this blog that you might find interesting if you have arrived till the end of this one!